It has been five months since I last blogged. We were so busy working on our house that I didn't take the time to keep up with my blog. Things have settled down a bit now - my new sewing room is completed and our family reunion held at our house is behind us. So, now that life is pretty much back to normal (whatever normal might be....)I won't stray away for so long.
My first goal is to get a camera that is user friendly for downloading pictures here. That is one of the big reasons I didn't take the time to blog. I have an outdated camera and was trying to take pictures from my cell phone to use on the blog. Time consuming and hard to get on the blog with such a little phone. I am researching cameras now with wifi to see what is good. Any input is greatly appreciated. Since retiring I have lost touch with new technology.
Pictures and updates of my new sewing room are to come! My quilting buddies have been over numerous times for sew days. We have enjoyed the space to be able to sew together.
Happy Sewing
Monday, August 25, 2014
Sunday, March 23, 2014
Vintage Singer's - Surprise From My Son
My son surprised me with two vintage Singer sewing machines he had in storage - how did I not know about that?
Here is the oldest one - an 1895 King Tut edition. I think also called the Spinx. It is badly rusted on the body and the head is frozen up. But, looks like all the parts are in tact. Has the long shuttle bobbin.
And here is the 1914 Singer Red Eye. Her body is in better shape, but she is missing the bobbin cover plate. She is also rusted and the head is frozen up. I have done some research on-line about restoring old vintage sewing machines. So, I decided to start on Red Eye since parts are readily available for this model. It was a very common sewing machine back in the day. Here she is before I started:
The first thing I did was remove the bobbin winder from the machine. Scary. The picture on the left with light aqua background is the bobbin winder before I cleaned it up. Nothing moves on it. Frozen solid with rust.
I used WD40 to loosen all the screws and free up all the frozen pieces. Then I was able to take it apart to clean all the separate pieces.
The picture on the right with the pink background is after I cleaned it up and got it back together. I was so excited. The wheels now spin and all the pieces with springs now move freely. I just need to order a new rubber piece for the bobbin winder wheel and she'll be ready to wind bobbins. Already have the rubber piece and bobbins on order!
I cleaned it up with WD40 to loosen the rust and some steel wool and a lot of elbow grease. I had to make sure not to get WD40 on the painted area with decals as it will harm them. I took it all apart to clean each piece. I used sewing machine oil to clean the black painted piece then I rubbed it with some Turtle Car Wax to shine her up the best I could. I used a polishing compound on the metal pieces. They are stained from being rusty for so long, but all in all I am pretty happy how she looks now. Pretty good for being 100 years old and no telling how long she lived outside in the weather. And, she can move once again!


Here is the oldest one - an 1895 King Tut edition. I think also called the Spinx. It is badly rusted on the body and the head is frozen up. But, looks like all the parts are in tact. Has the long shuttle bobbin.
 |
| 1895 King Tut Spinx Edition |
And here is the 1914 Singer Red Eye. Her body is in better shape, but she is missing the bobbin cover plate. She is also rusted and the head is frozen up. I have done some research on-line about restoring old vintage sewing machines. So, I decided to start on Red Eye since parts are readily available for this model. It was a very common sewing machine back in the day. Here she is before I started:
 |
| 1914 Red Eye |
The first thing I did was remove the bobbin winder from the machine. Scary. The picture on the left with light aqua background is the bobbin winder before I cleaned it up. Nothing moves on it. Frozen solid with rust.
I used WD40 to loosen all the screws and free up all the frozen pieces. Then I was able to take it apart to clean all the separate pieces.
The picture on the right with the pink background is after I cleaned it up and got it back together. I was so excited. The wheels now spin and all the pieces with springs now move freely. I just need to order a new rubber piece for the bobbin winder wheel and she'll be ready to wind bobbins. Already have the rubber piece and bobbins on order!
I cleaned it up with WD40 to loosen the rust and some steel wool and a lot of elbow grease. I had to make sure not to get WD40 on the painted area with decals as it will harm them. I took it all apart to clean each piece. I used sewing machine oil to clean the black painted piece then I rubbed it with some Turtle Car Wax to shine her up the best I could. I used a polishing compound on the metal pieces. They are stained from being rusty for so long, but all in all I am pretty happy how she looks now. Pretty good for being 100 years old and no telling how long she lived outside in the weather. And, she can move once again!
Sun Bonnet Sue gets her Rag Rug
Finally finished the rag rug. I ended up taking it apart so I cound join the rows together properly. I like it much better this way. But, I learned a few things from making this rag rug - it is my first. I was increasing at the same place on each row and that made it start to turn square. At the point I figured this out I didn't want to rip out again. So, I just started increasing randomly. That was much better. So, had I done this from the start my rug would be more oval than it is. Live and Learn! Here it is with Sun Bonnet Sue.

Wednesday, March 19, 2014
My Treadle Cabinet
We are still working away on expanding my new sewing room and other renovations in our house. I never dreamed it would take this long, but hubby decided to change out our old single pane windows for new dual pane/tinted windows.
So, in the meantime, I have been dreaming and planning for my new sewing room. I dug out my old treadle sewing cabinet. I have had it since I was about 13 years old when I first started sewing. It was in my bedroom closet and I used it to set my sewing machine on to sew. There was never a treadle in it and I have no clue where it came from. My parents have both passed away, so I have no one to ask how I got it. My parents were not into antiques, so I am guessing it came from a family member or someone they knew. I used it to hold my sewing machine up until about 20 years ago, when I decided she needed to be refinished. I started the job, but never completed it. She has been in storage since then. My son is going to refinish for me - Yeah!! He loves to refinish old things. I am excited to have her back in my life and will give her a special place in my new sewing room. Here she is in the back of my car heading to my son's house.

I am doing some research to find out what kind of cabinet she is. She is not a Singer. She has no markings so I have nothing to use for clues. I have been looking on Pinterest and other sites. So far, I think she is a National based on what I have seen on the internet.
There were little treasures left in her drawers from years ago. Little jewelry with my daughters' names inscribed. Old wooden spools of thread and odds and ends of rick rack and notions that I used back in the day. Another trip down memory lane! I can't wait to get her back.
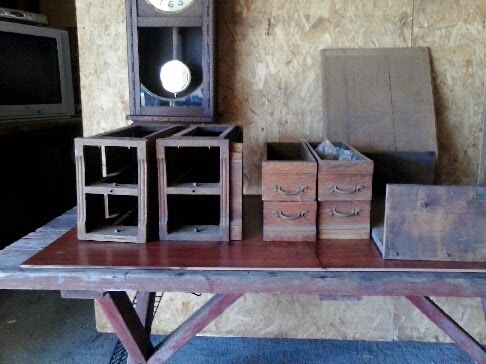
Here are some pics my son sent me after he got her all apart.


So, in the meantime, I have been dreaming and planning for my new sewing room. I dug out my old treadle sewing cabinet. I have had it since I was about 13 years old when I first started sewing. It was in my bedroom closet and I used it to set my sewing machine on to sew. There was never a treadle in it and I have no clue where it came from. My parents have both passed away, so I have no one to ask how I got it. My parents were not into antiques, so I am guessing it came from a family member or someone they knew. I used it to hold my sewing machine up until about 20 years ago, when I decided she needed to be refinished. I started the job, but never completed it. She has been in storage since then. My son is going to refinish for me - Yeah!! He loves to refinish old things. I am excited to have her back in my life and will give her a special place in my new sewing room. Here she is in the back of my car heading to my son's house.
I am doing some research to find out what kind of cabinet she is. She is not a Singer. She has no markings so I have nothing to use for clues. I have been looking on Pinterest and other sites. So far, I think she is a National based on what I have seen on the internet.
There were little treasures left in her drawers from years ago. Little jewelry with my daughters' names inscribed. Old wooden spools of thread and odds and ends of rick rack and notions that I used back in the day. Another trip down memory lane! I can't wait to get her back.
Here are some pics my son sent me after he got her all apart.
i
And here are a couple of pictures after he started working on the top. I had already stripped the veneer off years ago, so it is down to bare wood that the maker used which was not intended to show. It has worm holes in it. I think that gives it character.

Monday, March 10, 2014
Rag Rug Progress -Fabric Balls Wound - Rag Rug Growing
I finally finished prepping all the fabric for the rag rug. That was sure a long process. Actually the ironing took the longest since the fabric wants to twist so much. That is a step that can be omitted. I decided to iron the fabric in half with wrong sides together so you see the fabric on both sides. I wanted as much color to show as possible. But, if you don't care if the back side of the fabric shows then ironing is not necessary. Here are my fabric yarn balls. Now to get started crocheting the rug.

Crocheting the rag rug sure goes a lot faster than prepping the fabric. I will have this done in less time than it took to prep all the fabric. I spent about 14 hours ripping the fabric, sewing ends together and ironing the fabric. I began crocheting this afternoon - I figure I am about a third of the way into the rag rug and only spent about two hours crocheting. Here is what I have done so far. Molly came in to check it out - a new rug to lay on.....

I am not liking the way it looks where I changed colors. I should have joined with a slip stitch before adding the next color. I didn't even notice this until I saw this picture. Darn, do I rip everything out now and start over, or start joining at the end of each color now, or continue crocheting the rug as I have been???? Will I be happy if I don't rip this out????
Crocheting the rag rug sure goes a lot faster than prepping the fabric. I will have this done in less time than it took to prep all the fabric. I spent about 14 hours ripping the fabric, sewing ends together and ironing the fabric. I began crocheting this afternoon - I figure I am about a third of the way into the rag rug and only spent about two hours crocheting. Here is what I have done so far. Molly came in to check it out - a new rug to lay on.....
I am not liking the way it looks where I changed colors. I should have joined with a slip stitch before adding the next color. I didn't even notice this until I saw this picture. Darn, do I rip everything out now and start over, or start joining at the end of each color now, or continue crocheting the rug as I have been???? Will I be happy if I don't rip this out????
Thursday, March 6, 2014
Shoulder Pocket Bag Party
I got together with some of my Quilty sisters yesterday and we all made a shoulder bag with two zippers and lots of pockets. We had sew much fun and all of our bags are so darn cute. Here they are.


This is mine. I choose to use batiks in the blue family since I wear jeans so often and I just LOVE batiks. This is the front. It has a zipper on the top opening and see the other zipper on the front pocket. The light accent is also a big pocket. It also has D rings and swivel snaps to attache the shoulder straps.
And this is the back of mine. It has two pockets. and there are also two pockets inside the bag. Now all I need to finish it off is a couple of zipper pulls.
Sunday, March 2, 2014
Quilt Run Finds
Sorry the pictures loaded sideways. Cute kittens and teddy bears.

And a Care Bear focus fabric for a little baby girl.

Subscribe to:
Comments (Atom)